
A fundamental single-pole light switch is the kind where you flip the button's toggle or paddle up or to transform lights on and off. This familiar switch remains in truth described by equipment distributors as well as also electrical contractors as a "single-pole light switch."
A single-pole switch has two brass incurable screws on the side that link to the electrical circuit's black (" hot") cords. One black cord originates from the power source (the electric panel) and also the numerous other goes to a number of lights.
When the switch in on, power flows through it from the incoming cord to the outbound cord. When you transform the turn off, it disrupts the circulation of electric energy. Consider it like a drawbridge that vehicles and vehicles can cross when it's in positioning but, when open, disrupts the circulation of vehicles. Several switches likewise have a eco-friendly grounding screw that attaches to the circuit's bare ground cord for safe "grounding" of the button.
Just how to Wire a Dimmer Change
A dimmer switch is wired the same way as a standard single-pole switch, nonetheless the dimmer normally has it's own cords presently linked to the button-- so you use cable nuts in contrast to screw terminals. In this picture, you can see the red-colored "hot lead" cords of the dimmer are affixed to the incoming black cord from the electrical source (the electrical panel) along with the black cord that mosts likely to the light's black cable which, in this scenario, is a white cord that has actually been taped with black electrical tape to indicate that it works as a black cable.
Wiring a One Method Switch Over
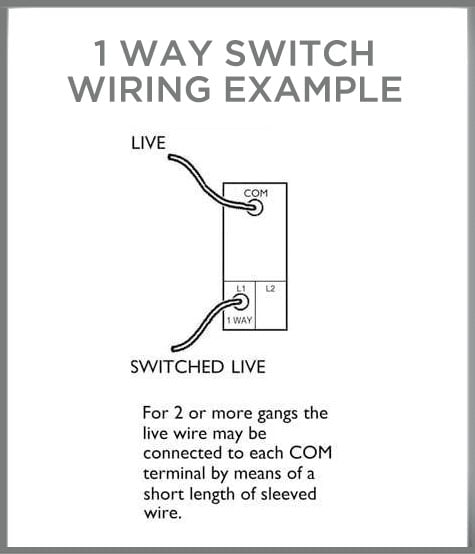
A one method light switch has 2 terminals which is an normal substantial as COM or C. The usual is for the live wire that supplies the input voltage to the button. The different other incurable is kept in mind as L1 and also is the result to the light.
When you're circuitry attractive light switches such as chrome or stainless steel and so on, you'll find that the switch will in addition have an L2 terminal which suggests it's a 2 way button. If you're circuit is just one method, you can disregard this incurable as well as it will still function. This is due to the fact that 2 method switches can also be used on one technique circuits. Distributors don't make ornamental one technique buttons.
Circuitry a 2 Way Change
The a lot more recommended light button with two method altering, which suggests you can transform the very same light fixture from 2 switches that are located in various sides of a space. 2 suggests switches have a COM terminal in addition to L1 and also L2 terminals.
When L1 is off L2 would hop on.
When L1 gets on L2 would be off.
There are 2 circuitry options for this:
2 method button circuitry examples
Advanced dimmer switches like Varilight Eclique ( presently called V-Pro Multi-Point Touch) as well as likewise Lightwave have an S incurable rather. The S terminal can just be linked to a coordinating servant as well as also will not collaborate with a usual two means switch. Right here is a wiring instance of a Lightwave RF Gen1 dimmer switch shown from behind:
Intermediate Switch Over Electrical Wiring
Intermediate switching resembles 2 ways nonetheless permits a third switch to be incorporated. An circumstances of this would definitely be having one switch at the bottom of a stairs, one on the top in addition to one in the center. It's not known as 3 means transforming given that you can furthermore include more buttons for 4 way switching or even more.
Intermediate switches have terminals significant L1, L2, L3 as well as also L4. Look at the diagram listed below that demonstrates how to indicates a three indicates switch:
Intermediate button electric circuitry
Two Means Dimming
2 approach dimming allows you to dim a light from 2 places. You can not use average rotary dimmer switches to do this since you might perhaps dim the light to 10% with one dimmer, after that walk over to the numerous other dimmer in addition to effort to lower the light to below 0%. Or vice-versa you could be attempting to lighten up the light over 100%. This would certainly cause significant instability on the circuit, like the moment when the ghost busters crossed the light beams!
You can have a dimmer button as well as additionally an on/off turn on the exact same. The dimmer will do the dimming and also both means button will certainly be able to change it on and off. If you have actually reduced the lights to 50% the switch will definitely maintain changing it and additionally off at that level till you lower it once more.
Up till fairly lately 2 means lowering was quite costly, possibly done using Lutron Rania up till they obtained stopped. With the arrival of Varilight V-Pro multi-point dimmers ( formally Eclique) and Lightwave Smart switches, this is currently easy to do as well as does not cost extreme. Varilight calls for a combination of master as well as slave dimmers for it to work. While the Lightwave Smart collection dimmers can be set via their Application to carry out 2 approach or perhaps 3 method dimming.
Wireless Switches
Wireless switches over typically require an added receiver for them to work. The receiver is placed in the ceiling void close to the lights. It receives an RF (Radio Frequency) signal from the switch to inform the receiver what to do. If you've presently obtained cords ready you can still utilize a cordless button by finishing the wires. Brand like Rako along with Lutron have their very own cordless systems. Lightwave quit their Gen1, Web Link Collection.
Wireless switches over used to be battery powered, Ener-J have in fact taken this a step much better with their kinetic buttons. Taking advantage of the power created from pressing the button, which suffices to send the signal to the receiver. The receiver after that switches over the lights along with are easily available in dimmable or non dimmable variations, in addition to a Wi-Fi version for mobile phone control. They can either be screwed or stuck to a surface along with have in fact IP65 ranked variations which are suitable for bathrooms.
Cellular Telephone Dimming
If you mean to control your lights from a mobile phone, the most convenient and additionally most cost-effective method of doing this is with Lightwave. All you need is a master dimmer switch, the Lightwave RF Wi-Fi center as well as the Application which is free to download and also set up. The brand-new Smart Collection decreases LEDs effortlessly as well as likewise provides timer and additionally scene configuration functions. You can likewise regulate wise power outlets, heating controls as well as likewise other Lightwave attachments.
Lutron QS Keypad Electric Wiring
Amongst the primary benefits of using a residence automation system over common dimmer buttons is that you can replace those huge cumbersome looking double plate, 3 in addition to 4 gang dimmer buttons with fashionable looking keypads. Lutron keypads have up to 10 switches in addition to dim up as well as reduced down. The switches can be set to establish lighting scenes of your picking. Here is an circumstances of an engraved 5 switch Lutron SeeTouch keypad in satin nickel with black switches.
Lutron QS Seetouch
Once you've picked the attribute of each scene you can obtain the switches inscribed by finishing a type as well as additionally sending back to Lutron, this is consisted of in the expense of the keypad. You could either have something easy like Scene 1, Scene 2 and so forth or attempt something much more bold like 'All On', 'television Seeing', 'Event Time', ' Assessing' and ' Incorrect' like in my instance. A scene can be a combination of countless lighting circuits that prepare to various dimming degrees. ' television Watching' might lower your primary LED downlights to 10%, your wall surface area lights to 30%, your cove LED strip lights to 50% as well as even transform a table light on, all at the touch of one button.
If you're taking into consideration setting up a capacity automation such as Lutron Grafik Eye QS or Energi Savr Node ( called ESN), the matching keypads which are referred to as SeeTouch call for to be wired totally differently to any kind of one of the typical buttons that we've reviewed. To begin with they require a 24V DC supply which can be taken directly from the Grafik Eye or ESN. The keypads can also take care of electronic blinds which are similarly conveniently available from Lutron.
Using the suggested Lutron control cable which has 2 sets of cable televisions, one set is for power as well as the various other collection is for signal. Included keypads as well as other parts can then be attached from one to the various other making use of the QS Link terminal. You can likewise connect a Grafik Eye QS to an Energi Savr Node and likewise have them both on the same system.
The Lutron Grafik Eye is now ceased as it was as well overpriced to stay on top of different other up in addition to coming creative lighting brands.
Lighting Circuits-- Loop In, Loop Out
The favoured ways of circuitry recessed downlights is making use of the technicality in, loophole out technique. This is a form of identical wiring that has one cord ( normally twin and likewise world 6242Y) having the real-time, neutral along with planet cables knotting in and after that out of leach light ideal. This is an alternate to the conventional junction box system, it makes use of much less cable tv and also is much faster to finish.
Various downlights have a loophole in, technicality out incurable block connected to them. For example the Ansell iCage has the largest one which was specifically created for this type of circuitry. A favored function for downlights is push-fit terminals which similarly have loophole in, technicality out terminals. Some have them straight linked to the downlight in addition to some featured electrical wiring ports. The picture listed here programs the loop-in, loop-out circuitry approach:
loophole in, loophole out electrical wiring
When setting up downlights that don't have their own link system, a number of installers create their very own by utilizing a Click Flow Adapter. With this connector you wire the smaller sized male adapter right into the downlight as well as also the comparable women connector right into your loophole in, loop out circuit. Then you just plug the downlight right into the circuit as well as additionally continue the procedure with the complying with ones.
Various other downlights like the Aurora M Collection along with Click Ovia Nano are supplied with their very own electric wiring adapters. The male port is already pre-wired right into the downlight so half of the work is currently provided for you. An fringe benefit of using Flow Connectors is if the downlight fails you can disconnect it as well as get it transformed by yourself without having to get an electric professional back in to divide it and after that reconnect the substitute.
Lighting Circuits-- Collection Electric Wiring
Series circuitry is mainly utilized with several LED lights that are powered from the precise very same LED driver. It is usually taken advantage of with smaller sized LED downlights or with LED ground lights that are constant present. One of one of the most noticeable constant present scores are 350ma or 700ma. This design listed here demonstrate how it's done:
Collection wiring example
Although a lot of the LED downlights we provide are constant current, they are each supplied with their actual own LED automobile motorist with is either straight affixed to them or trails behind them like an old fashioned halogen as well as additionally reduced voltage transformer mix. If you're wiring a mains supply right into each LED automobile motorist separately it would certainly be classed as similar wiring as well as can be done using the technicality in, loophole out technique. Identical electric circuitry is mainly used with continuous voltage illumination items such as LED strip lights.
Wiring a Downlight
If you're upgrading an existing halogen downlight you'll most likely either have tricks voltage GU10 or reduced voltage MR16 (GU5 .3) halogens. Decreased voltage halogens will certainly have a transformer; this will definitely need to be disconnected as it will definitely no longer be asked for. The only factor you would certainly require to maintain the transformer is if you intended to utilize MR16 LEDs that run a/c, this is a much less prominent alternative as you need to ensure the existing transformer works with the LEDs as well as likewise if you're lowering them, you'll need to ensure that the MR16 LED, transformer and additionally dimmer button are all suitable. Great deals of installers select the GU10 or integrated option as their are much less components to consider and it typically sets you back less.
Hole Cut Out Dimension
If you're transforming existing downlights you'll prefer your new ones to have a similar opening eliminated dimension otherwise you'll either require to make the holes bigger or make them smaller (yes I claimed smaller) which would include re-plastering your ceiling as well as re-cutting the holes. Matching the hole dimensions is constantly a essential decision in the choice treatment.
Unless particularly specified downlights are wired in parallel, downlights are only usually wired in collection when a number of lights are being powered from the exact same LED chauffeur. Relying on which kind of downlight you pick, you may need to develop stipulations to planet them. Here are 2 examples that clear up how to wire a downlight, one is for a GU10 fire placed downlight as well as one more discussing simply how to wire an bundled LED downlight, every one has it's own earthing provisions:
Wiring a Fire Rated Downlight-- Ansell iCage
The Ansell has really obtained a massive technicality in, technicality out incurable block that permits 2x 1.5 mm double in addition to planet cords to wired right into one downlight and right into the following one. The iCage is given with both a GU10 and also a GU5 .3 reduced voltage light holder.
When utilized with the GU10 light owner, the downlight is tricks voltage as well as also have to be earthed. This is recognized as a Course I thing. If you're using the reduced voltage GU5 .3 light owner the downlight is categorized as Training course III and likewise does not require a earth.
Wiring an Integrated LED Downlight - Halers H2 Pro
Some incorporated LED downlights like the marketplace leading Halers H2 Pro from Collingwood Lighting are SELV which represents Security as well as safety Bonus Low Voltage. This suggests that the voltage of the LED chauffeur is listed here 12V air conditioner or as much as 30V DC. Voltages below 20V can't usually be really felt by the body and likewise are taken into consideration secure.
SELV light installments don't require an earth; they are determined as Class III constructed products. The LED chauffeur for the H2 Pro is in addition dual insulated which suggests it has 2 layers of insulation around the on the internet components, this additionally indicates it does not require to be earthed. The DC output voltage is divided from the a/c supply voltage.
The H2 Pro has a real-time as well as neutral cable television coming off the LED motorist, you'll need additional junction or adapter obstructs to wire them. By adding a Click Flow port you can create your really own technicality in, loophole out system as mentioned in the previous loophole in, loophole out electrical wiring section.
Wiring a Light Switch
This FAQ has been produced to explain the different types of light switches, circuits and terminologies that are used in useful content modern day lighting installations. Ranging from simple one way switches to more advanced keypads that are used in home automation systems such as Lutron.
Any electrical wiring should be done by a qualified electrician. We are not electricians and have taken all the diagrams from the instructions that are supplied with the products we sell. Basic safety procedures should always be followed such as switching off the mains supply before commencing any work. The maximum current rating should also be adhered to; this is usually 6 to 10 amps per switch for on/off switches and for dimmer switches its 250W or 400W. LEDs often need to be de-rated, for example the Varilight V-Pro is rated a 120W for LED and 400W for incandescent with a maximum of 10 LEDs. These ratings differ with 1 gang, 2 gang and 3 gang versions.
If you’re attempting to wire anything more complicated like upgrading a 4 gang light switch to a 4 gang dimmer switch it may be worth taking a quick photo first just in-case you get muddled up with the wires and need to revert back.This FAQ has been produced to explain the different types of light switches, circuits and terminologies that are used in modern day lighting installations. Ranging from simple one way switches to more advanced keypads that are used in home automation systems such as Lutron.
Any electrical wiring should be done by a qualified electrician. We are not electricians and have taken all the diagrams from the instructions that are supplied with the products we sell. Basic safety procedures should always be followed such as switching off the mains supply before commencing any work. The maximum current rating should also be adhered to; this is usually 6 to 10 amps per switch for on/off switches and for dimmer switches its 250W or 400W. LEDs often need to be de-rated, for example the Varilight V-Pro is rated a 120W for LED and 400W for incandescent with a maximum of 10 LEDs. These ratings differ with 1 gang, 2 gang and 3 gang versions.
If you’re attempting to wire anything more complicated like upgrading a 4 gang light switch to a 4 gang dimmer switch it may be worth taking a quick photo first just in-case you get muddled up with the wires and need to revert back.
Wiring a One Way Switch
A one way light switch has two terminals which is a common marked as COM or C. The common is for the live wire that supplies the input voltage to the switch. The other terminal is marked as L1 and is the output to the light fixture.Wiring a One Way Switch
A one way light switch has two terminals which is a common marked as COM or C. The common is for the live wire that supplies the input voltage to the switch. The other terminal is marked as L1 and is the output to the light fixture.

The paddle switch itself has a pleasant clicky come to feel to it, but it is lesser than most: individuals that wish to bash paddle switches Together with the side in their hand may prefer the larger sized Leviton Decora switches.
In lots of situations, this permits you to manage your lighting with the voice. In the same way, You can utilize the company’s proprietary application to manage your lights out of your clever house, Computer system, or cell system about Bluetooth.
Furthermore, the panel has created-in movement sensors, so it may change lights on and off when you enter and go away a space; a small digital camera permits you to use multiple Amazing panels as video clip intercoms.
We’ll tell you about tips on how to wire 3-way switches. The wiring is much more intricate than a conventional single-pole switch, but we’ll describe how to produce the connections. After you’re carried out, you’ll be capable to Handle a light from two switches.
The white wires in this situation are merely linked together and by no means contact the switches. The black wire is going to be linked to the black screw on the switch
In some homes, wall switches control an outlet, as an alternative to a light fixture, to help you plug in a floor or desk lamp, and after that switch it on or off out of your wall, rather then the lamp by itself.
There are two primary wiring configurations for installation of a single pole light switch. For both of those configurations, you will require the following materials:
BestReviews spends Countless several hours studying, analyzing, and testing goods to propose the best picks for some individuals. We only generate profits if you buy an item via our backlinks, and all thoughts with regard to the products and solutions are our have. Browse much more
Next, consider the reverse on the the new/substitute switch plate and establish the wire terminals labelled ‘Prevalent’ and ‘L1’ (a further L2 port may be found beside the L1 port on some models meant to be made use of as just one switch - the L2 port is Employed in wiring two-way circuits and should be dismissed when wiring a 1-way circuit).
Along with helping you in managing and scheduling your lights, decide on apps help you keep track of your linked functions to trace the level of Vitality they use. For those who discover your Vitality Monthly bill spiking, attributes like these can go a long way toward monitoring down the culprits.
We've got dedicated this part on the in depth description of switches and in which they can be positioned. Previously these included an easy toggling amongst two selections, and that might open up and close the electrical circuits.
Then you can find other choices that come with remote control. This will enable you to alter the light from anywhere you happen to be sitting and provides by far the most number of advantage.
We use cookies to make wikiHow excellent. Through the use of our web page, you agree to our cookie policy.Cookie Settings
A three-way light switch is a single in which you have two switches which have the ability to Handle a similar light or list of lights.